Deadpool's Diner Guide - Apr ’26
Lauren covers some Diner decks, the event’s generosity, and tells you what table you should be playing at.


It’s finally time for Deadpool’s Diner to reopen after being closed for half a year! If you weren’t here then, well… it was the most generous event in the history of Marvel Snap. I personally made off with a bunch of Emotes and literally dozens of Borders.
The big question: how generous is Diner this time? I’ll answer below!
Additionally, I’ll be covering the question, which table should you play at? Diner itself asks for more high-level strategy than any other game mode, and I’ll give you a simple plan to follow.
As per usual, the economy coverage will be in early access for our subscribers for the first ~48 hours of the event. But first, some (free) decks from Scott!
Diner Differences
The core gameplay of Deadpool’s Diner is almost identical to the usual Marvel Snap you find in Ranked mode. There are a few important differences:
- ONLY your Snaps can raise the stakes for you
- Each player can Snap up to three times (once per turn)
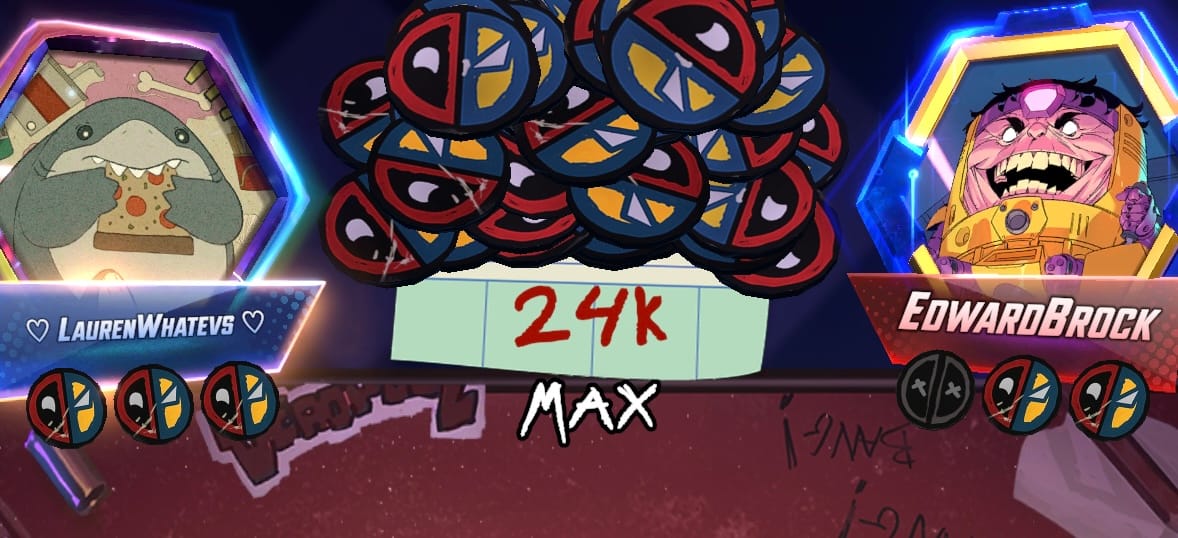
Basically, you have full control over whether you’re playing for 1, 2, 4, or 8 “Cubes”. Except we’re playing with Bubs, and your opponent might retreat before you get all your Snaps in.
It’s worth noting you risk nothing (but your time) by staying in and losing.
Deck Decision
To take advantage of what makes Diner different, you want a deck that can Snap early and often!
Choose one that…
- Has clear Snap conditions
- Can Snap aggressively
- Has opening hands that are easy to read (clear play lines and win conditions)
- Can create deterministic final-turn board states
- Can go tall (to compete with everybody else picking a good Diner deck)
Without further ado, here are several such decks from Scott.
Doomed Diner
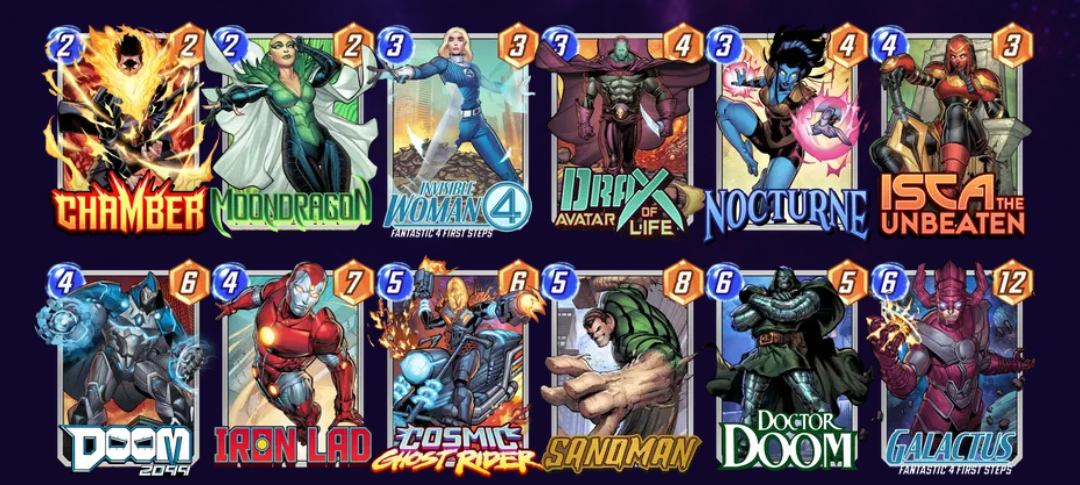
Doom 2099 decks always have excellent Snap equity in the mid-game. You know what's in your hand and can generally predict if your opponent can wreck you with opposing tech. Sandman specifically provides a solid ability to Snap late. Nocturne can help get out of a jam or deal with opposing Limbo decks. Cosmo is also a great call in that slot for this meta, but you could also go with Caliban or Copycat.
End of Dinner
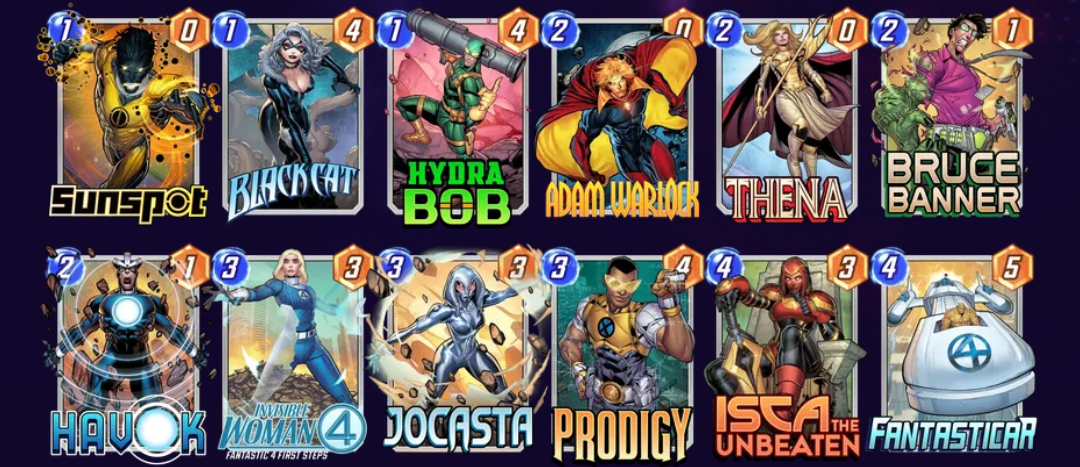
Almost no deck is better against a captive opponent than End of Turn. You'll know by Turn 5 if you're going to pop off giving you two “free” Snaps late, while you can often Snap very early on a strong hand.
Discount Diner
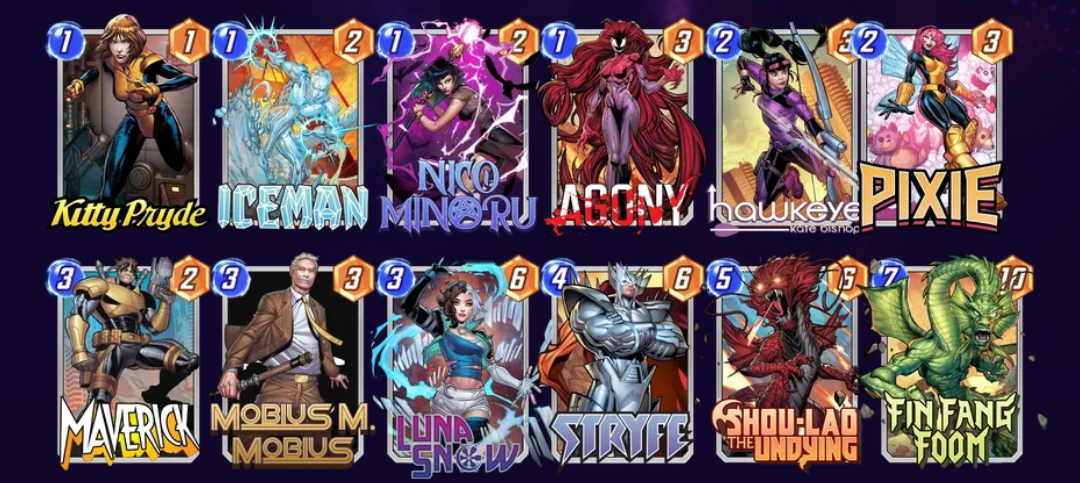
The queen of power Snapping is Pixie. On ladder your opponent absolutely can't stay in on a Snap following Pixie into Mobius, but they will here. That and you can Snap again when you draw a cheap Foom?! Sign me up.
reniD evitageN, Served Two Ways
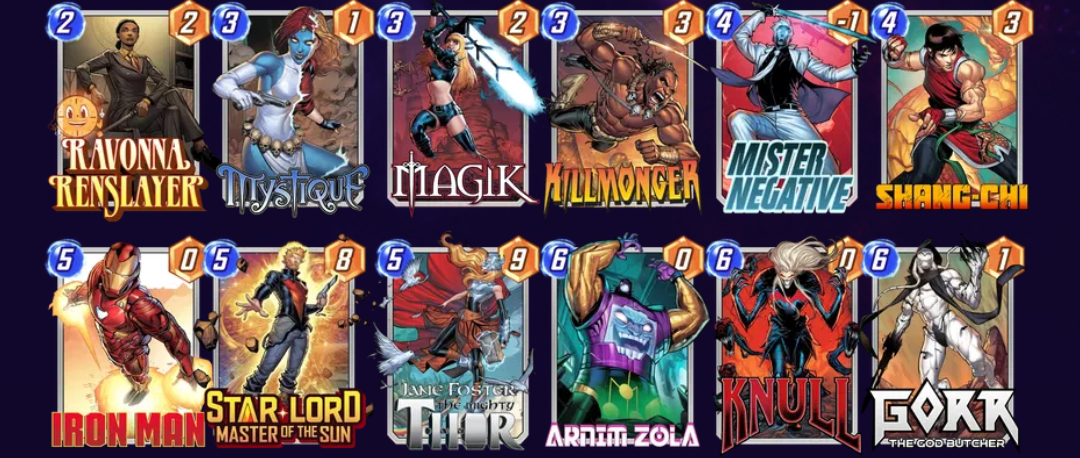
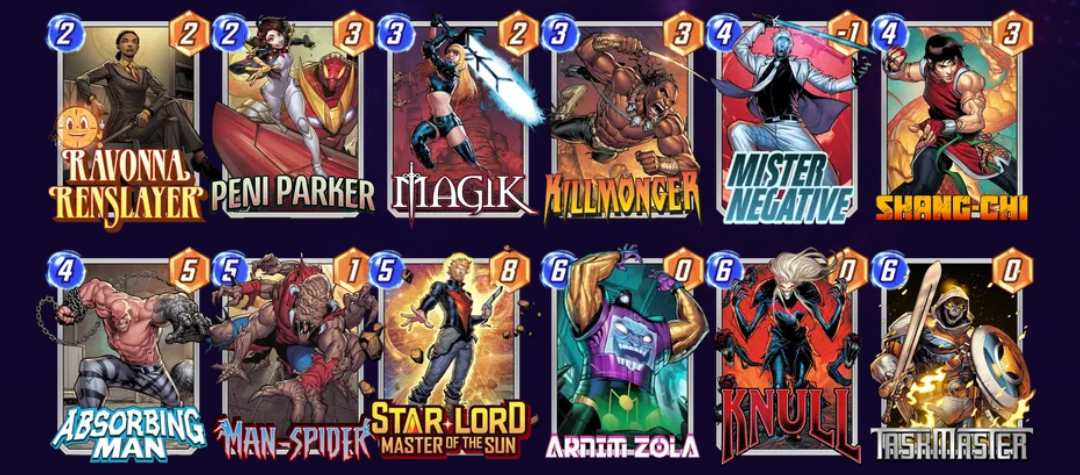
The Negative decks with Star-Lord shouldn't work now that Star-Lord is a 5/8, but the thing is… they just still do! And Negative is definitely a deck that lets you Snap early and often! I favor a more destruction-y approach to help counter the extra Destroy gamers that may come out for this mode.
Economy Tips
Some of the economy advice for a given event is the same every time it runs. I’ve compiled all that into a single guide. I recommend checking it out! You can focus on this event by reading any section with the Deadpool’s Diner logo.
 LaurenWhatevs
Fourth Location subscribers had early access to the rest of this guide (focused on the Diner economy) until the event was ~48 hours old.
Your support lets us put the time into these articles that they deserve! If you benefit from Fourth Location and have the means, please consider signing up. Full access to early and exclusive content starts at just $4 a month. Big thanks to our subscribers. 🩵
Grand Prizes
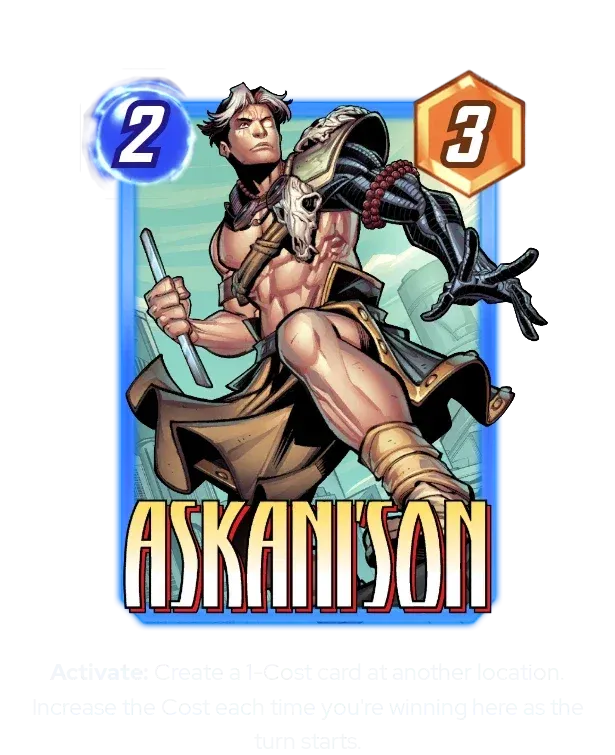
The Shop features the new card, Askani’son! He’ll be event-exclusive for now, then enter Series 4 in a month.
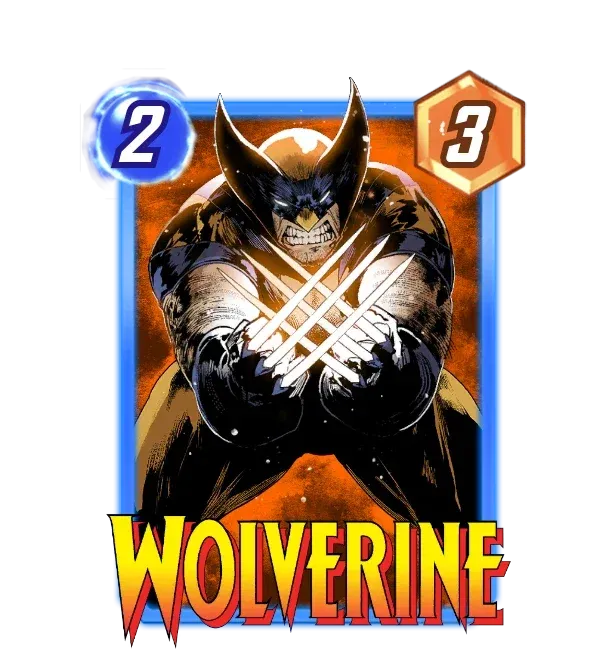
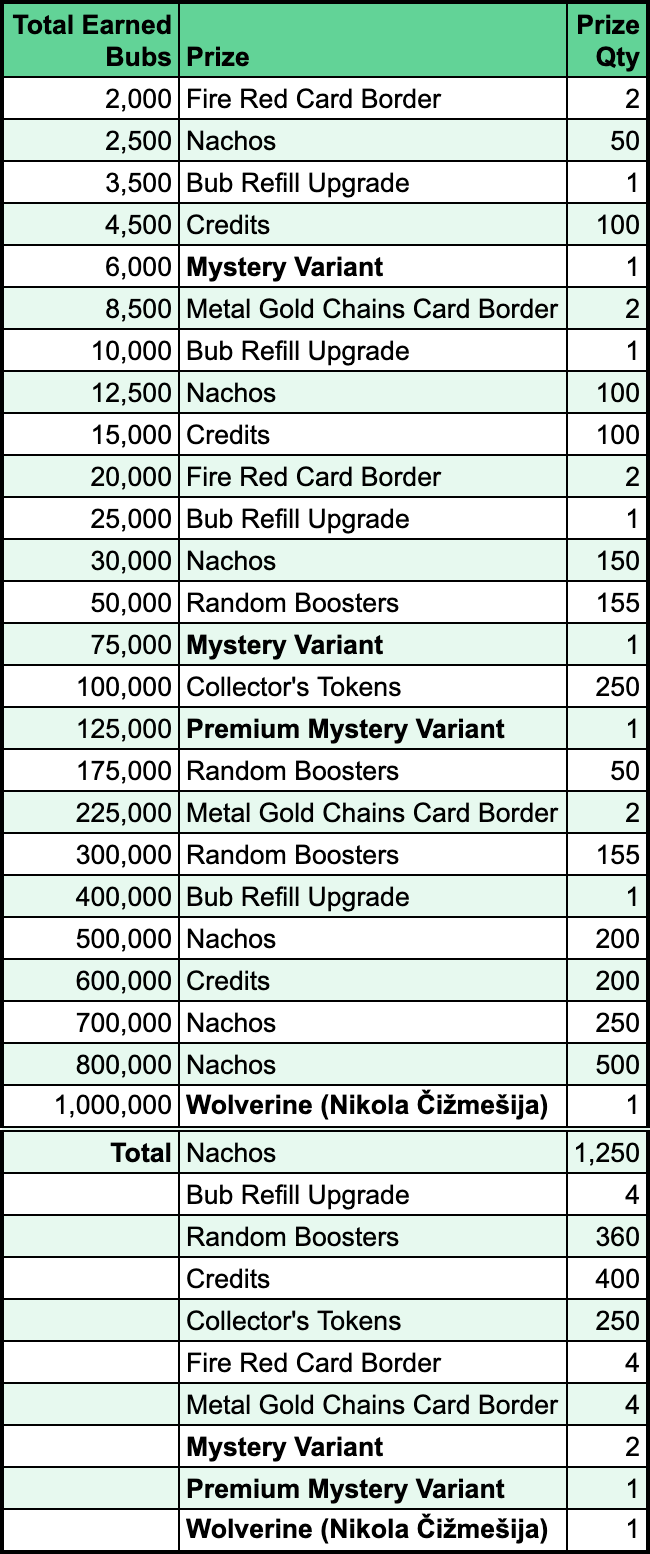
The end of the prize track features this excellent Wolverine by Nikola Čižmešija – one of my favorite Snap artists! I’ll be running this on my Wolverine as soon as I get it.
All About Tables
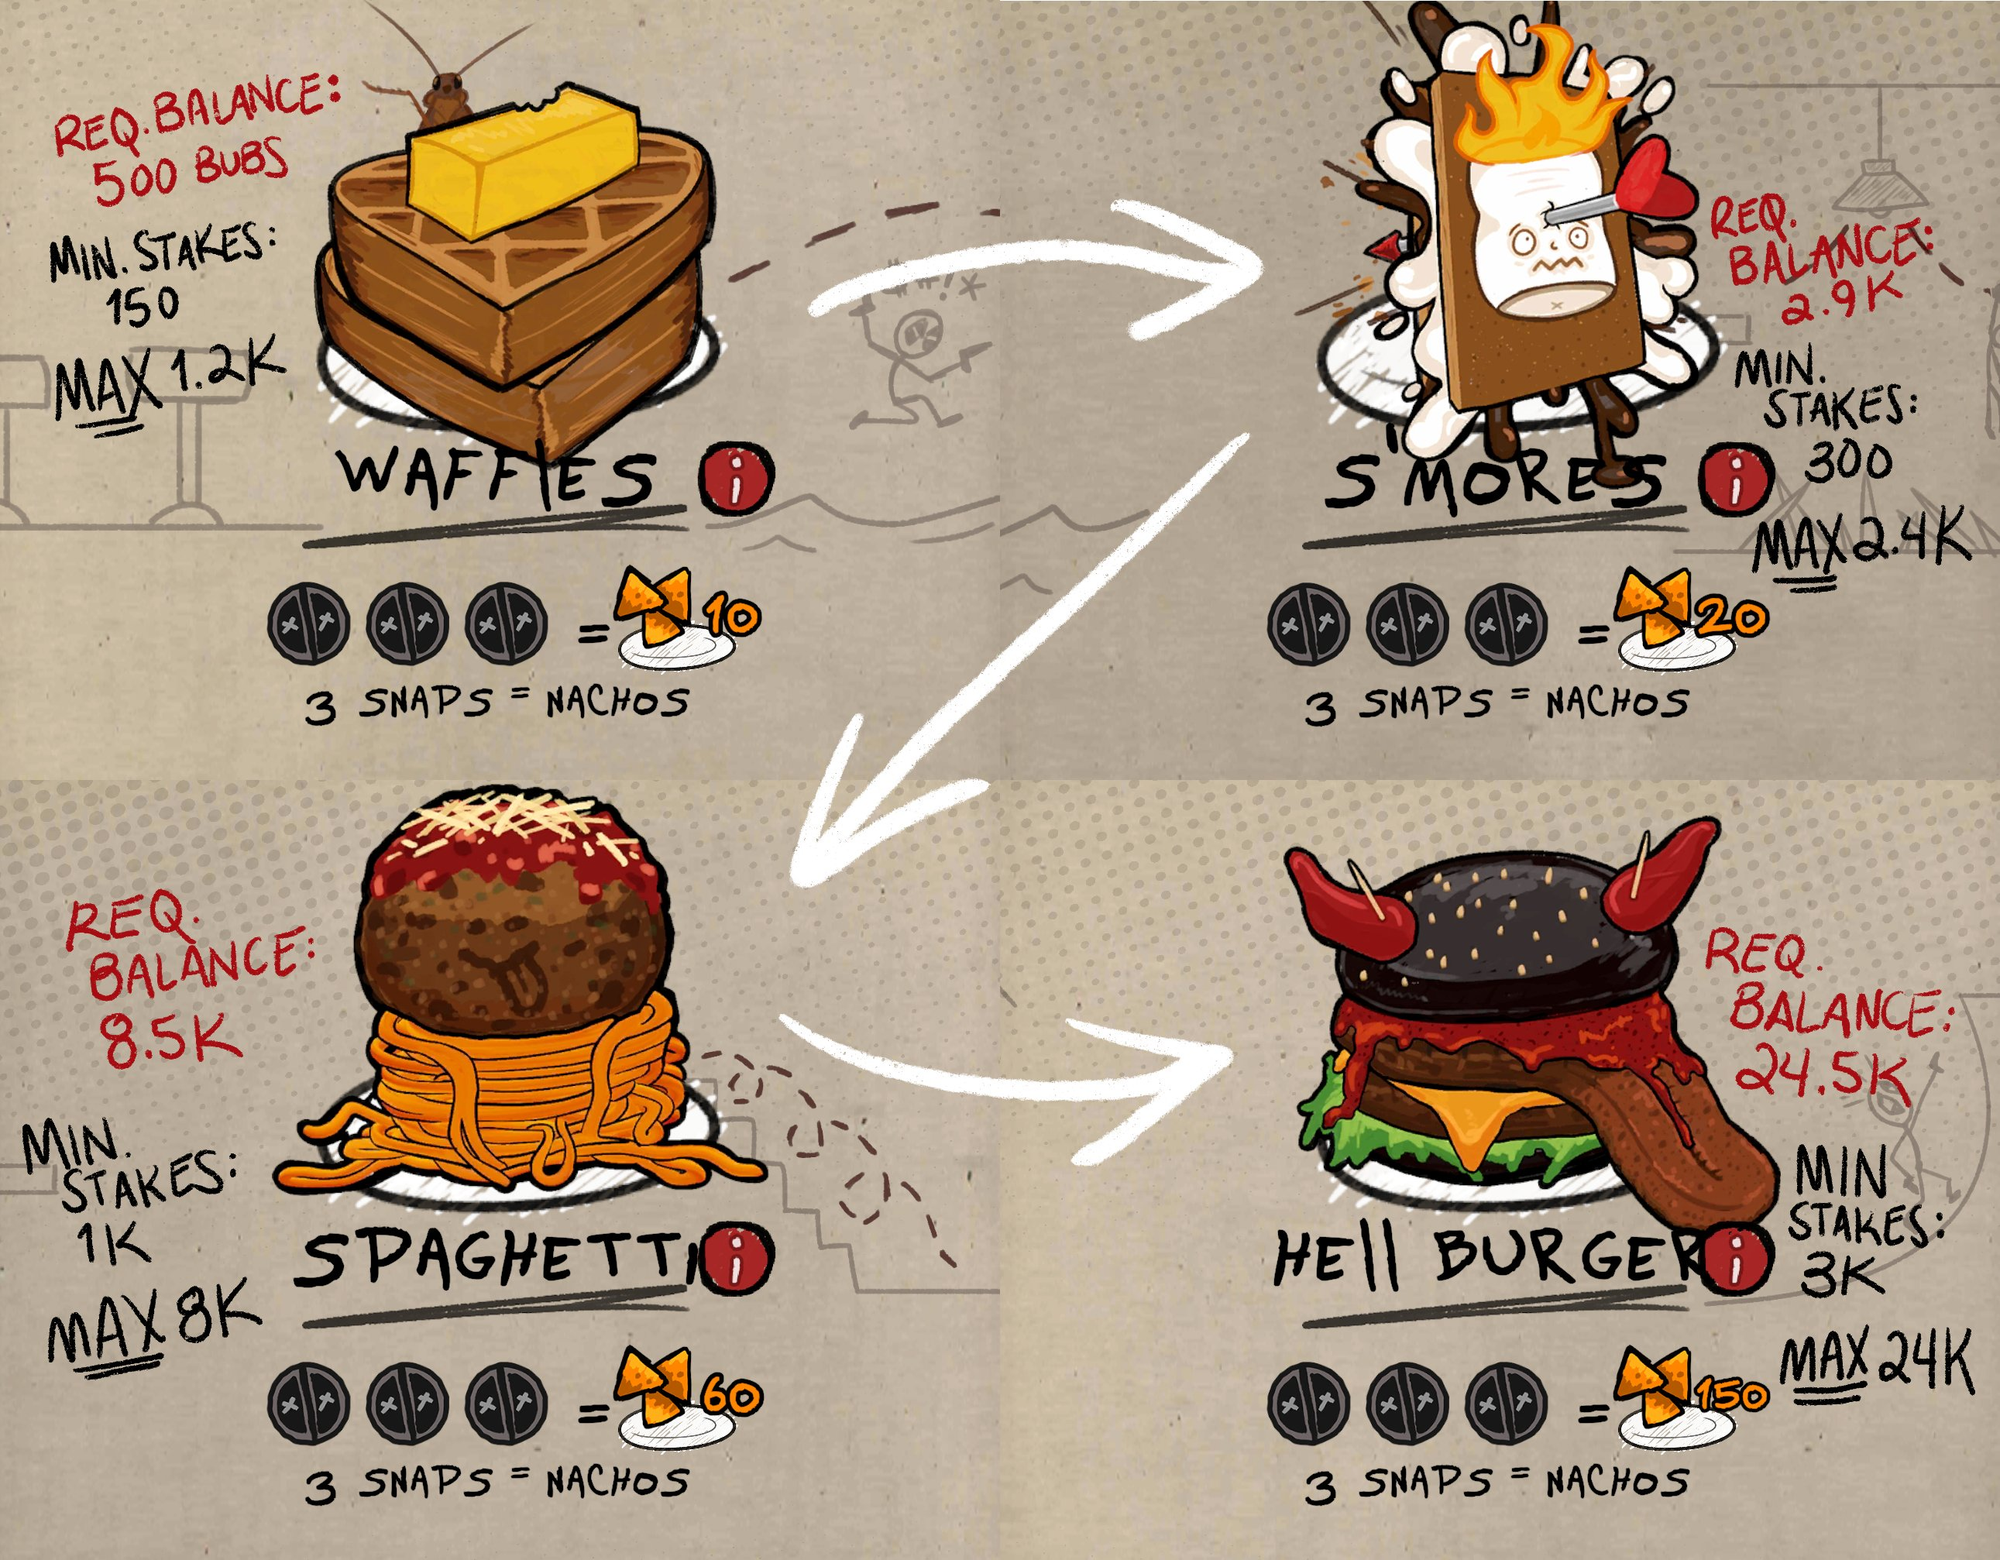
Early on, you’ll only have enough Bubs to play the starter table, Waffles. As you build your balance of Bubs, you’ll gradually gain access to the others. Each successive table asks you to put more Bubs on the line, but also lets you earn more Bubs and Nachos.
By the way, every Bub you earn also gives you progress along the Reward Track. Nachos are for spending in the Diner Shop.
Which Table?
You generally want to be playing on the higher Tables to maximize your Bub and Nacho gains. However, if you play on a Table too early, you risk running out of Bubs and temporarily losing access to the higher Tables (or even every Table).
You can use this “Table table” as a simple guide to which Table you should be playing at any given time.
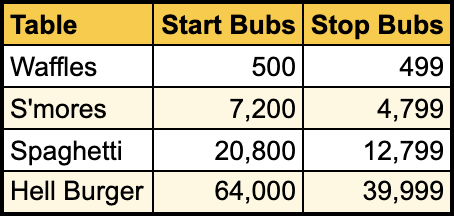
Start playing a table when you have at least as many Bubs as its “Start Bubs” number.
Stop playing a table when you lose enough Bubs to reach its “Stop Bubs” number.
These numbers are a good baseline to minimize the risk you will ever run out of Bubs. I would call them moderately risky. You could adjust them up or down depending on your skill and how risk averse you are. As-is, they’ll let you lose two games at 8x stakes, and still have enough to lose two more at 8x on the next table down.
Bubs & Bankruptcy
What if you do run out of Bubs? Not to worry – you’ll slowly regenerate Bubs over time. This regen rate is equal to one-eighth of your Bub Cap per hour, until you hit your Cap.
As you progress along the Reward Track, you’ll unlock Bub Refill Upgrades that increase both your Bub Cap and Bub regen rate. It also upgrades the rates offered in the Bub ATM, where you can buy Bubs with Gold.
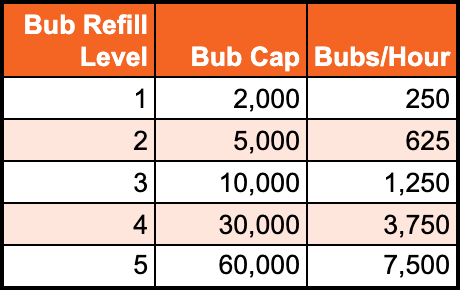
As you can see, you’ll eventually be regenerating enough Bubs that it only takes four hours to reach the Hell Burger Table.
Diner Goals
This is the basic outline of what you’re trying to achieve:
- Gain Bubs to access higher Tables and get Bub Refill Upgrades
- Maintain a Bub balance that lets you safely stay at Hell Burger
- Farm Hell Burger for Bubs and Nachos
As you’re climbing, remember your Snaps you have 100% control of the stakes in this mode, and your Snaps matter immensely. Wins at 8x stakes easily counteract losses at 1x stakes.
Nacho Farming
Nachos have come up a few times already. Really, they’re what you’re chasing more than anything else. Bubs are just a means to more Nachos.
You get Nachos from a Table when you’ve Snapped three times at that Table. It doesn’t matter how many games it takes for you to get those Snaps – but extra Snaps don’t roll over to the next set of three.
Ideally, you shouldn’t Snap at all on losing games, and you should Snap three times on winners. Of course, nobody can be that accurate.
Once you have a very large Bub balance, it can be a good strategy to Snap three times every game, even the losers. Nachos are just that much more important! Snap early to reduce how often opponent retreats stop you from getting all three Snaps in. Of course, it’s still helpful to win Bubs so you can keep playing at Hell Burger.
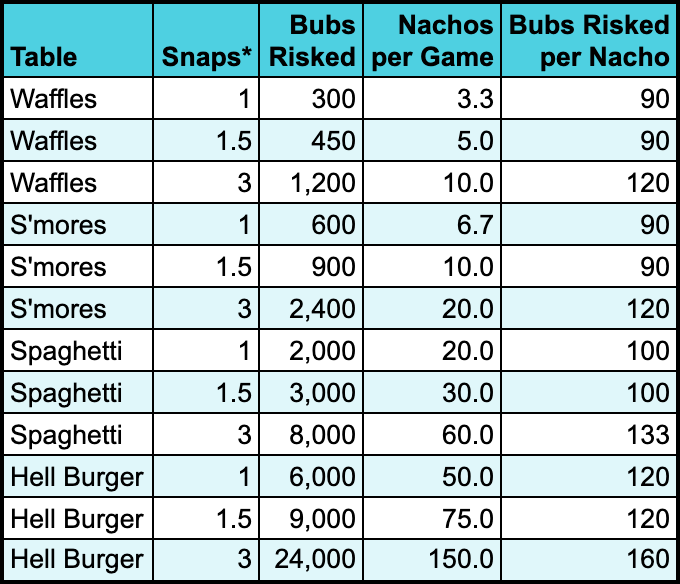
The table above highlights two different ways you might optimize your Nacho farming. Personally, I think “Nachos per Game” is far better to prioritize. It’s so much faster to be farming on Hell Burger.
Struggling to Farm
If you’re having a hard time maintaining enough Bubs to stay at Hell Burger, my first piece of advice would be to have more games where you don’t Snap (whether or not you Retreat). Consider switching to a deck that has even clearer signals of when it’s losing or winning.
If it’s still not working out for you, you could optimize your Nacho farming to minimize how many Bubs you’re risking per Nacho. The sweet spot is alternating between 1- and 2-Snap games at the S’mores table.
Reward Track
Your progress along this track counts every Bub you’ve won or bought with Gold. It does not count Bubs earned through regeneration.
Nacho Shopping
Here’s what you can buy in the Diner Shop:
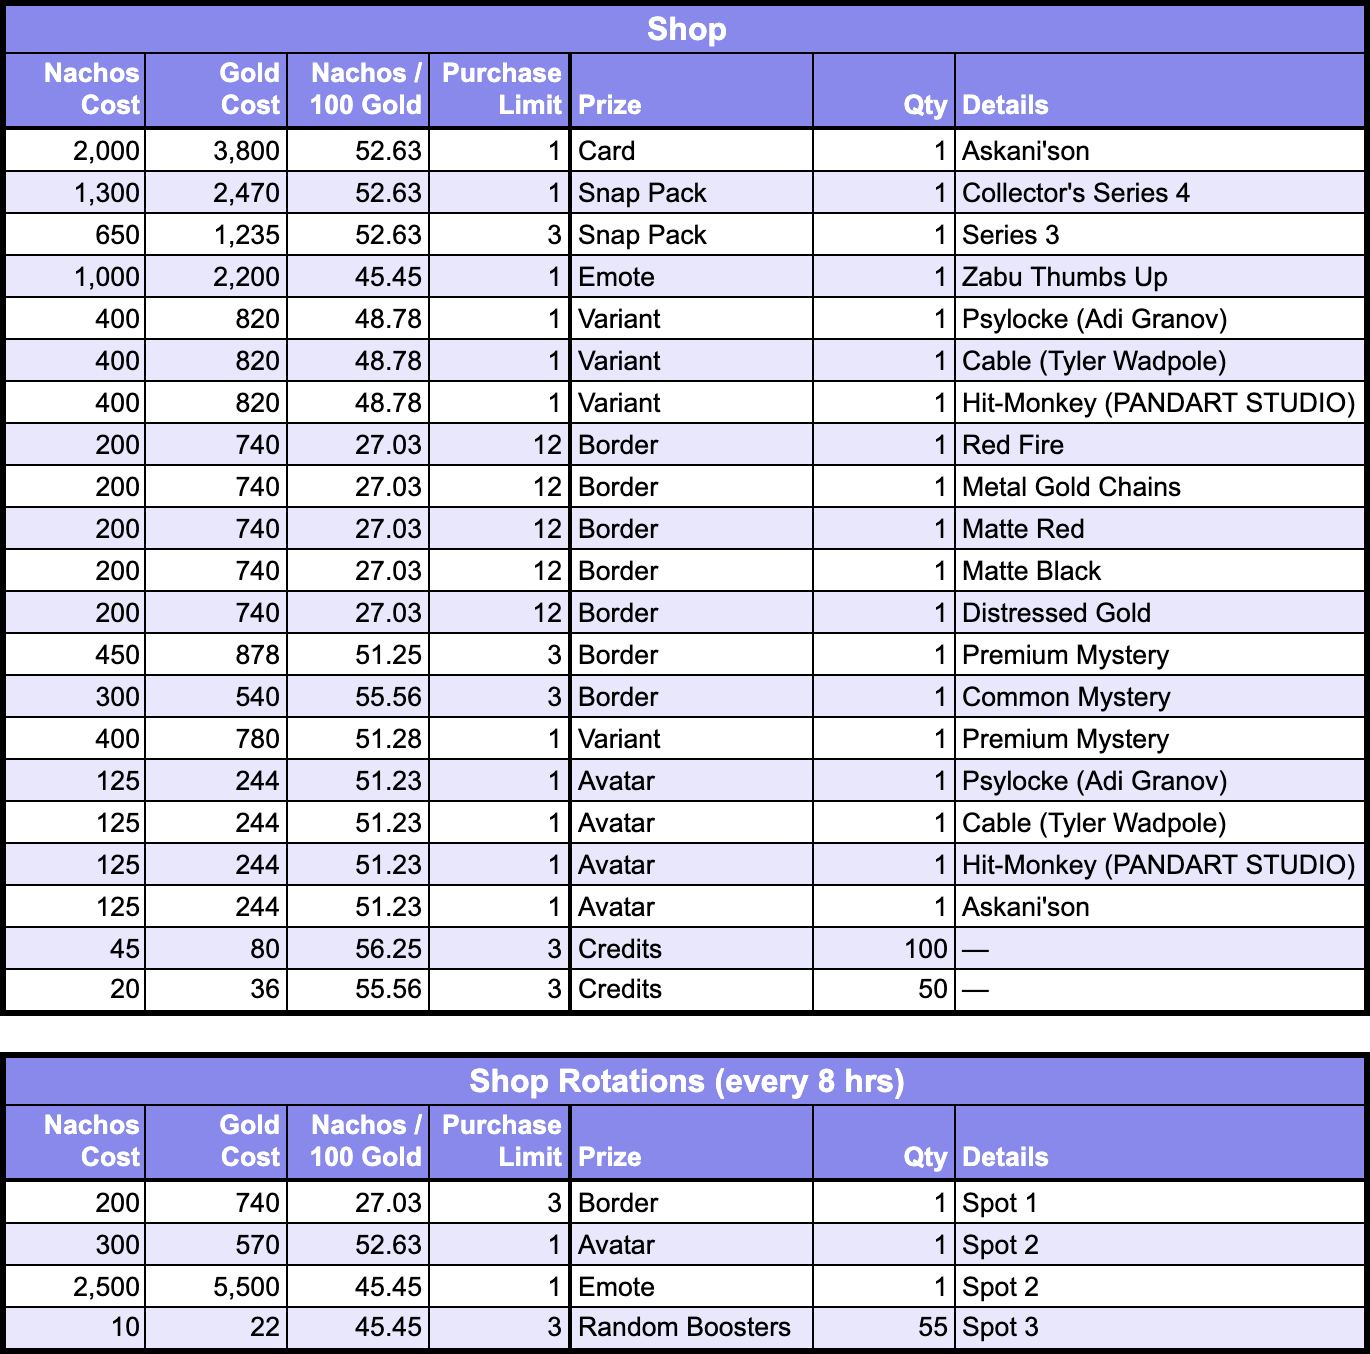
The Snap Packs will only be available for purchase if you’re missing at least one of the cards in them.
The Boosters in the rotating Shop are super affordable. Like… one game of Hell Burger buys you 825 Boosters. You should be buying them out every chance you get.
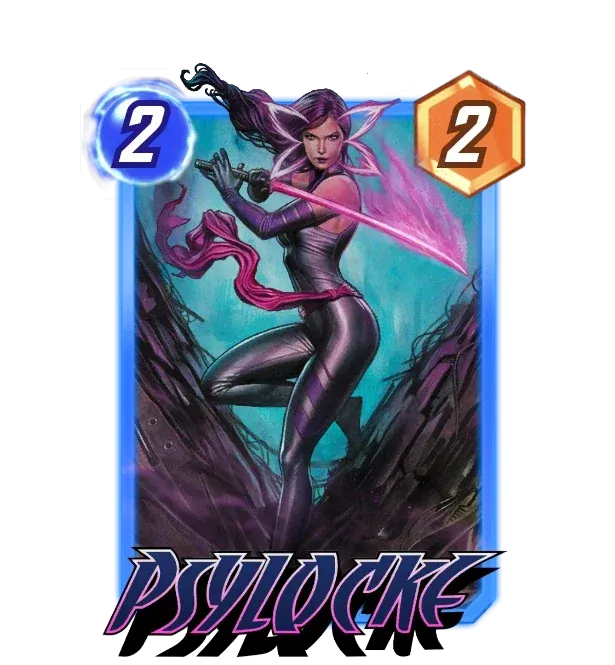
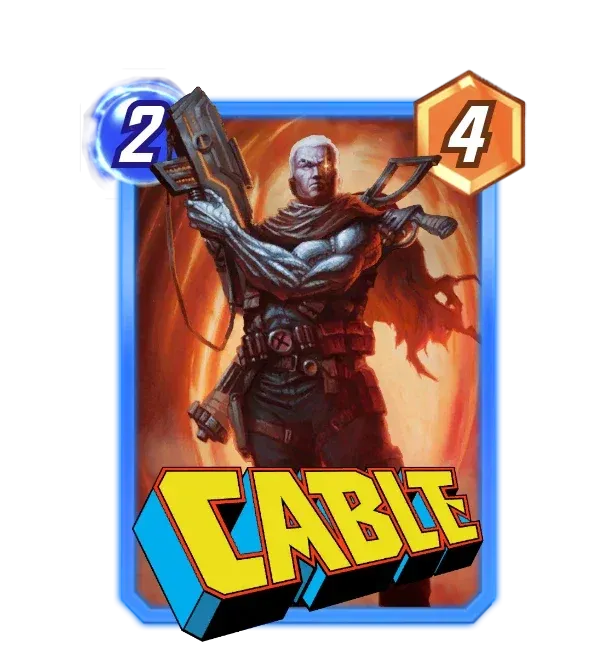
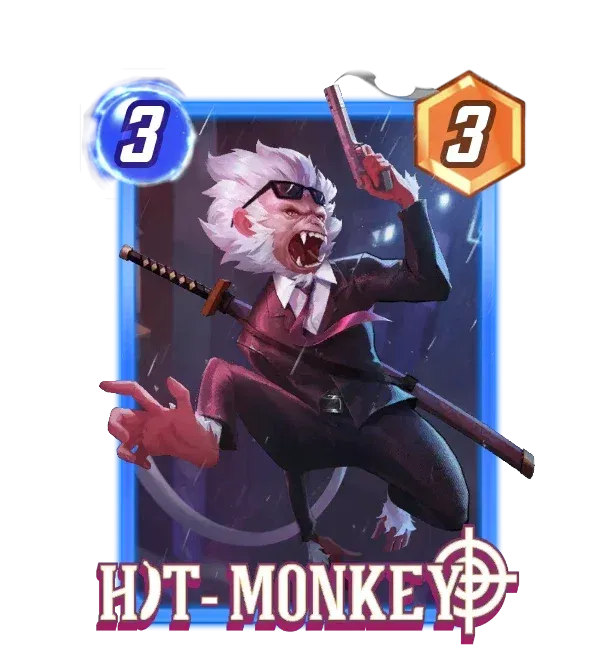
Psylocke is a Series 3 card and Hit-Monkey is Series 4 card! That raises their value if you’re missing either base card. In the case of Hit-Monkey, make sure you grab him before the Series 4 Pack!
Shop Priorities
As always, it’s up to you to know the subjective value of cosmetics. If you’d rather optimize your resources towards card acquisition, here’s how to prioritize your Nacho purchases. Ellipses represent big gaps in value.
- Hit-Monkey (unowned Series 4)
- …
- Psylocke (unowned Series 3)
- Collector’s Series 4 Snap Pack
- …
- Series 3 Snap Pack
- Credits
- Askani'son
- …
- All other Variants
Shopping with Gold
If you’re short on Bubs, you can cover the gap with Gold. It’s not a very efficient use of Gold, but if you are going to do it, there’s room for optimizing it. Each item has a different Nachos-to-Gold conversion rate. The items with the higher “Nachos / 100 Gold” give more bang-for-buck.
I think it’s worth noting how wild and disappointing it is that Askani’son costs 3,800 Gold to buy outright. At this point, it’s all-but-standard that event Premium Passes cost 800 Gold and include the new card. Askani’son is almost five times that! I understand Diner doesn’t offer a Premium Pass at all, but they should still have a reasonable option to buy your way to the new card. I know many players value getting the card ASAP, whether or not they want to play the event.
Is it Generous?
Yeah! I’m genuinely surprised how little they changed between last Diner and this one.
I often discuss how long an event will take, and how much currency you can expect to earn so you can plan your shopping. That just… doesn’t make sense here.
First of all, Diner remains generous enough that you should have no problem affording any of the prizes you want.
Second, Your Mileage May Vary. A lot. How good you are at winning. How aggressively you Snap. How soon you jump to the next Table.
More than any other game mode, Diner has a massive range in how well players can perform. I think that’s why the last Diner was so generous. It’s unique how Bubs and Nachos scale up over the course of the event. That makes it really hard to price! SD wanted to make sure casual players could get some stuff, and that made it trivial for the dedicated players to get… all the stuff.
Reward Track Side-by-Side
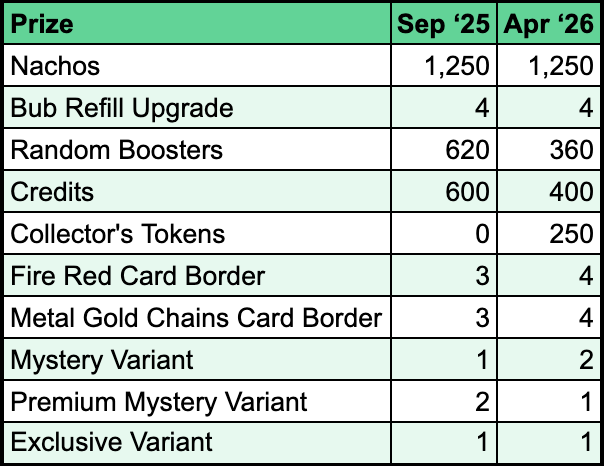
Comparing the Reward Track side-by-side, there are only a few notable differences:
- 200 Credits swapped for 250 Tokens (worth about 379 Credits)
- 2 extra borders
- 1 Premium Mystery Variant swapped for a regular Mystery Variant
I know that last one will matter a lot to some people, but I think it’s worth remembering that the vast majority of players do not have every Rare Variant.
It is also worth mentioning that you earned the final Bub Refill Upgrade at 175,000 lifetime Bubs in the last Diner. New Diner has moved this to the 400,000-Bub milestone. That’s a nerf, for sure – but if you’re careful with your Bub management, you should spend most of your time above Cap anyway. (thanks to Le Mulet for pointing this out)
Shop Side-by-Side
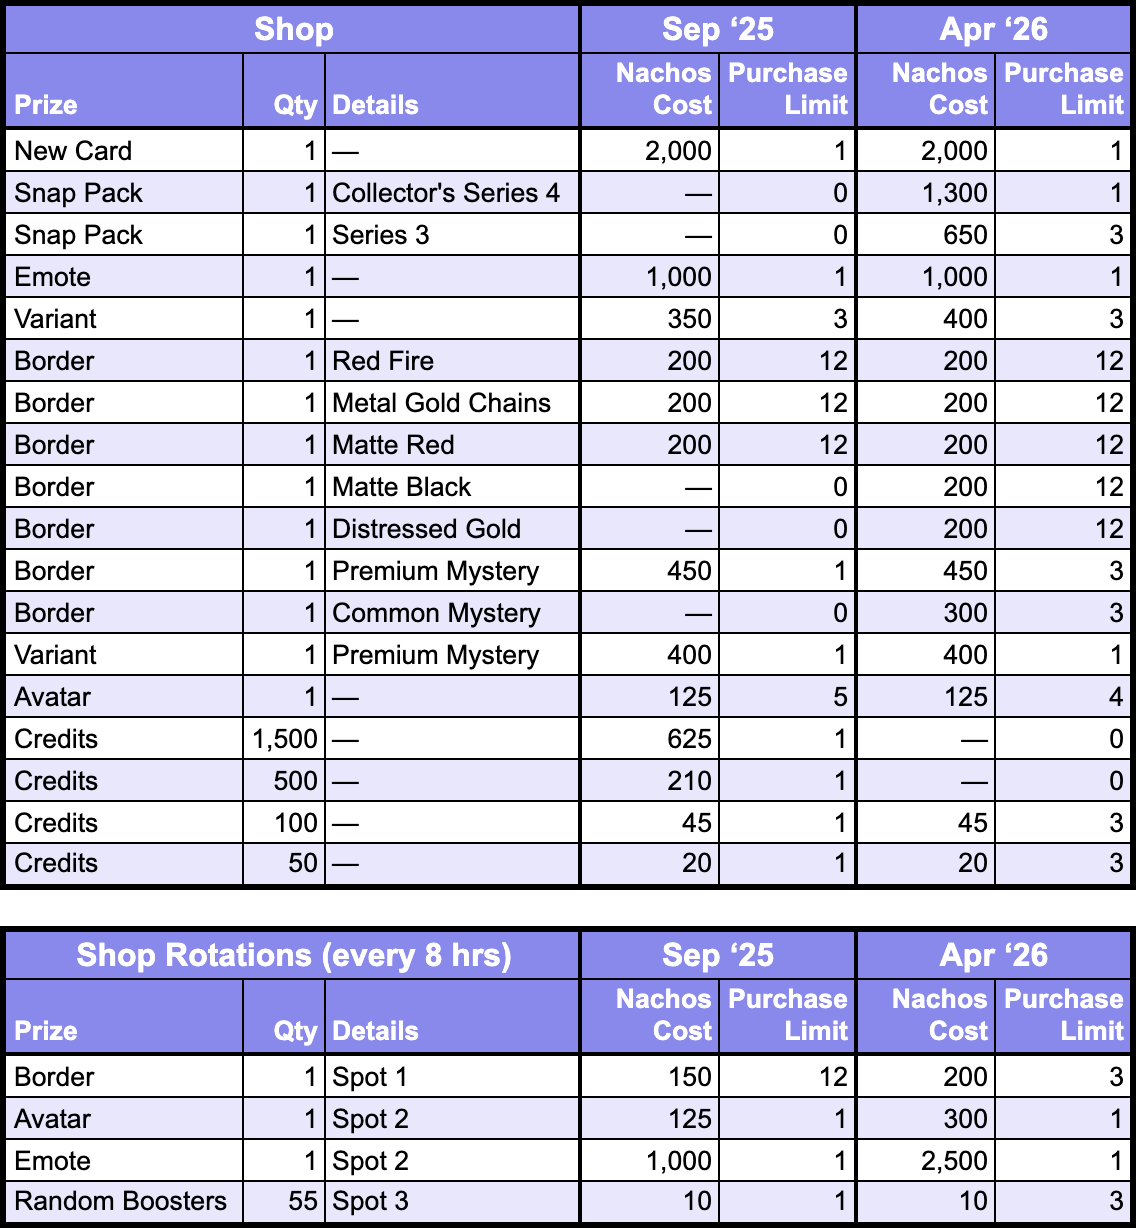
Let me call out the differences between the Diner Shops, too. First, just the differences in what is offered:
- New Diner added Snap Packs
- New Dinner added Matte Black and Distressed Gold Borders
- New Diner added 2 Premium Mystery Borders and 3 Common Mystery Borders
- New Diner missed the Avatar for the Reward Track final variant (Wolverine)
- New Diner removed 1,700 Credits
- New Diner rotating Shop reduced the number of Borders by 9
- New Diner rotating Shop added 2 sets of Random Boosters
The removal of 1,700 Credits is a big hit, but the Snap Packs are far more valuable for players who are still catching up.
And now the pricing differences:
- New Diner increased Variant cost from 350 to 400
- New Diner rotating Shop increased Border cost from 150 to 200
- New Diner rotating Shop increased Avatar cost from 125 to 300
- New Diner rotating Shop increased Emote cost from 1,000 to 2,500
That may seem like a lot of bullets, but look how much is the same! And not just in the Shops – it’s significant that the Tables are totally untouched. Nacho income will be the same as last time.
They hit the rotating Shop the hardest. That seems fair; that’s where players were getting tons of value last time. If you stay on top of rotations, I think it will still be realistic to get a bunch of Borders or Emotes. Like, last time Emotes cost 6.7 Hell Burger games and now they cost 16.7. That’s a steep increase, but also: where else in the game can you get an emote for playing 17 games?! They normally cost 2,200 Gold!
Conclusion
I’m impressed! I’m not surprised Diner remains the most generous event, but I am surprised how little they reined it in. It still takes just over a dozen Hell Burger games to earn the new card. Active players will still be able to clear out the Shop and get extras from the rotating Shop.
I’m also excited! I really enjoy the asymmetrical Snaps of modern Diner. It feels really close to an Unranked mode (which I would love to see added to Snap). Like a few of the other events, it’s a mode where there are actual stakes, but there’s very little pressure to retreat. I like it when the last turn gets to play out!
My biggest critique is one that doesn’t affect me personally – but I do really think it should cost 800 Gold to buy Askani’son outright. Certainly 3,800 Gold is too much relative to other event cards.
I hope you have a fun time playing in the Diner, or at least that you’re able to earn every prize you want!